
Playing games
Once a game is running it is handled by RetroArch (or a standalone emulator), but Leaf adds a few things on top: a menu, save states, fast switching between games, and per-game performance.
The in-game menu
Section titled “The in-game menu”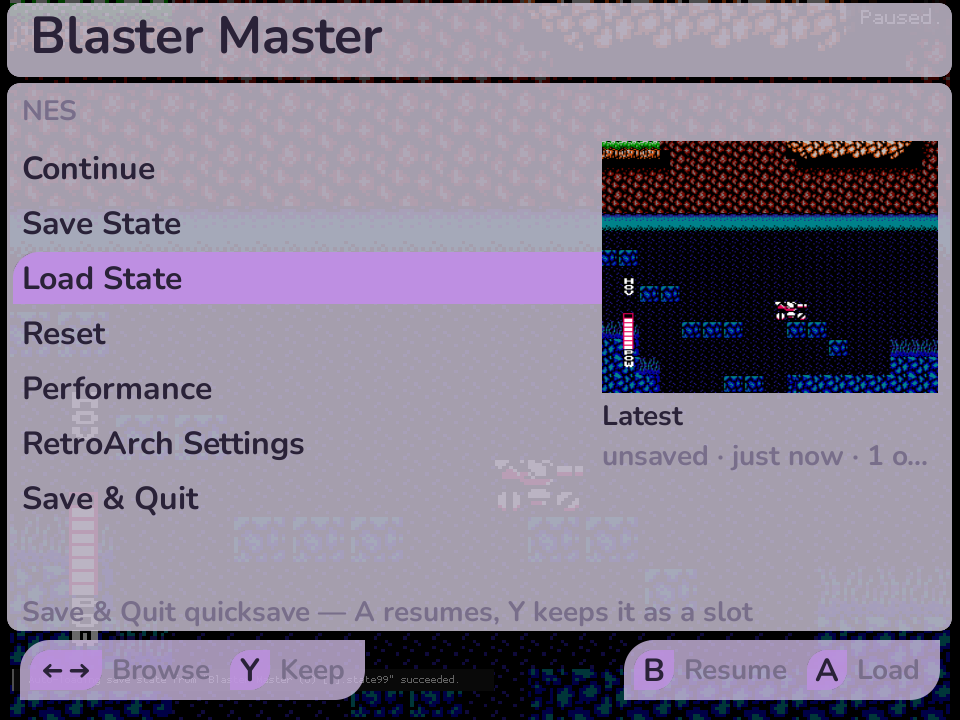
Press MENU while a game is running to open Leaf’s in-game menu. It pauses the game and floats over a dimmed snapshot of where you were. The options are:
- Continue - close the menu and resume the game (the B button does this too).
- Save State - save your exact spot to a slot.
- Load State - jump back to a saved spot.
- Reset - restart the game from the beginning.
- Performance - tune how hard the device works for this game (see below).
- RetroArch Settings - open RetroArch’s own menu for advanced options.
- Quit - leave the game and return to the launcher.
Standalone emulators may replace or adapt a few rows. For example, Nintendo 64 standalone has Leaf save/load and settings pages, but not RetroArch Settings, because it is not running inside RetroArch.
For filters and scanline effects, see RetroArch shaders. For where RetroArch’s own settings are stored, when they are saved, and the few Leaf sets on every launch, see RetroArch settings.
RetroArch hotkeys
Section titled “RetroArch hotkeys”RetroArch has its own hotkeys, separate from Leaf’s. They are held behind a modifier button so they cannot fire by accident while you play: on Leaf that modifier is MENU, and RetroArch calls it Hotkey Enable.
So a RetroArch hotkey is MENU + the button you bound it to. Pressing that button on its own does nothing but play the game.
To change or add one, open MENU → RetroArch Settings → Settings → Input → Hotkeys. Bind a hotkey to a button that does not clash with a Leaf shortcut, then leave RetroArch normally so the change is saved.
Changing the modifier
Section titled “Changing the modifier”The Hotkey Enable row in that same screen sets the modifier itself. You can move it to another button, and your choice is remembered across quitting a game, restarting, and updating Leaf.
Two things are worth knowing before you change it:
- Whatever you choose stops reaching the game while you hold it. That is how RetroArch prevents a hotkey chord from also pressing something in the game, and it applies to any button you pick. MENU is the default because it is not a game control. Choosing SELECT, for instance, breaks any game that asks you to hold SELECT.
- You can clear it, which makes every hotkey you have bound fire directly, with no modifier. That is a legitimate choice and Leaf will not undo it - but be deliberate, because those buttons will then do their hotkey job in the middle of a game. Leaf does not silently rebind or clear your hotkeys to compensate.
Quitting is the one exception Leaf keeps for itself: RetroArch’s own Quit hotkey stays unbound, so no button can drop you out of a game unexpectedly, even if you clear the modifier. Use Quit in the in-game menu instead.
Where Leaf’s shortcuts and RetroArch’s overlap
Section titled “Where Leaf’s shortcuts and RetroArch’s overlap”Leaf’s own hotkeys also use MENU. These are the defaults - the second button is yours to change, or turn off, in Settings → Hotkeys & Rumble → Hotkeys:
| Leaf action | Default |
|---|---|
| Game switcher | MENU + SELECT |
| Screenshot | MENU + L1 |
| Recording | MENU + R1 |
If both use MENU and you bind a RetroArch hotkey to a button a Leaf shortcut is using, Leaf wins and RetroArch never sees the chord. Move one of them, or turn the Leaf shortcut off.
Leaf only wins when it actually does something. A screenshot shortcut with screenshots turned off, or the game switcher outside a RetroArch game, hands the whole chord to RetroArch instead - so using a button for a Leaf shortcut does not reserve it in every situation. See Hotkeys.
Save states
Section titled “Save states”Save states capture the exact moment you are in, separate from a game’s own in-cartridge saves. They are the quickest way to stop and pick back up later.
- Save State and Load State each use numbered slots. Highlight the row and press Left / Right to pick a slot, then A to save or load it. Each slot shows a thumbnail so you can see what is in it.
- States are written to
States/on your SD card, so they survive reboots and you can back them up from a computer. - Quit defaults to Save & Quit, which writes a state automatically before returning to the launcher, so you can resume later from the game switcher or by loading it. Press Left / Right on the Quit row to switch it to a plain Quit that discards unsaved progress.
In-cartridge saves (a game’s own save feature) are written to Saves/ and work
as they always have. Save states are an extra layer on top.
The game switcher
Section titled “The game switcher”Press MENU + SELECT during a RetroArch game to bring up the game switcher: a carousel of your recent games laid over the current one. That chord is the default - Settings → Hotkeys & Rumble → Hotkeys puts it on another button, or turns it off.
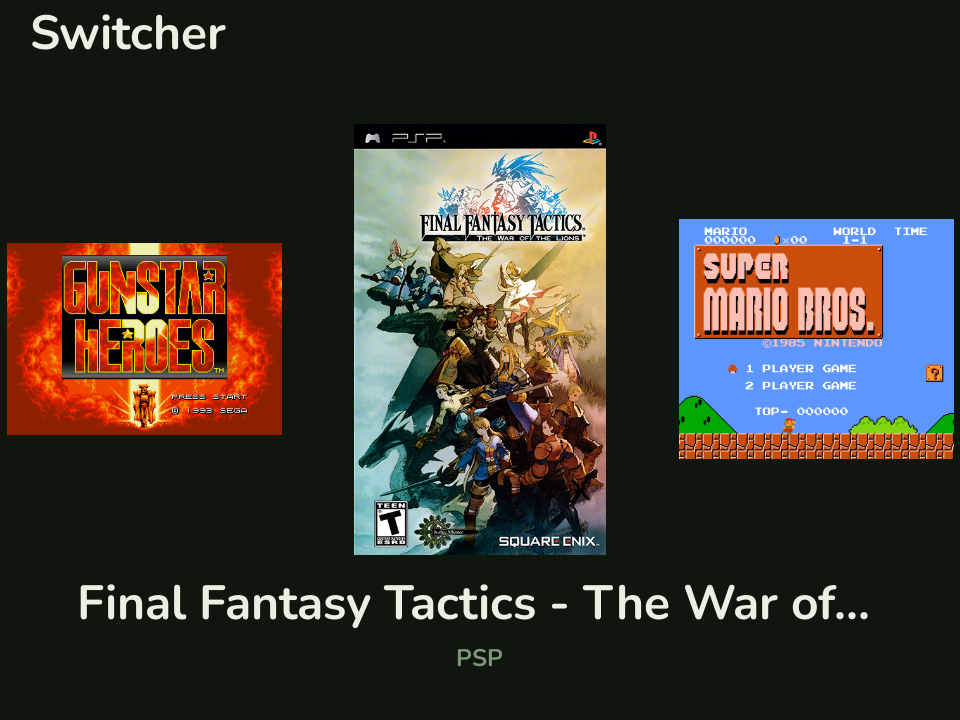
- Left / Right browse your recent games; the tile for the game you are in shows a live snapshot of it.
- A switches to the selected game. Leaf saves your current spot first, so you can hop between two or three games without losing progress.
- B closes the switcher and drops you back into the current game.
- Y removes an entry from the recents list (you cannot remove the running game).
When you do return to the launcher, it reopens exactly where you left off, on the same tab and game.
Standalone Nintendo 64 uses MENU + SELECT too, but there the chord is fixed
- it is not controlled by Hotkeys. It also works a little differently: Leaf saves the current N64 state, returns to the launcher, and opens the same switcher/recents flow there. Press A on the selected game to resume from that saved state.
Per-game performance
Section titled “Per-game performance”Pick Performance in the in-game menu to set how hard the device runs for the game you are playing. The choice is remembered per game.
- Profile - Auto, Balanced, Performance, Battery Saver, or Custom. Auto is a good default; it runs light systems efficiently and boosts for demanding ones.
- Custom reveals individual CPU, GPU, and DMC (memory) controls, each of which can be left automatic or pinned to a fixed speed. Raising these can smooth out a heavy 3D game at the cost of battery and heat.
- Reset Override clears the per-game setting and returns the game to your global profile (set in Settings → Games → Game Performance).
If a game runs slowly, try Performance here first. See also BIOS & cores for which systems are demanding on this hardware.
Nintendo 64 (standalone Mupen64Plus)
Section titled “Nintendo 64 (standalone Mupen64Plus)”Nintendo 64 games default to Mupen64Plus Standalone rather than the standard
RetroArch N64 core. Both use the same Roms/N64/ folder; switch between them
with Core from a game or system’s Options menu.
Standalone is the default because it lets Leaf tune the MLP1-specific parts that matter most for N64: video plugin choice, display handling, performance options, and the save-and-quit handoff back to the launcher. The RetroArch core remains available as an alternate when a particular game behaves better there.
Controls that differ from RetroArch. These are fixed, not the configurable hotkeys:
- MENU - open the Leaf N64 overlay.
- MENU + SELECT - save the current state and hand off to Leaf’s game switcher/recents flow.
- A from the game switcher or recents - resume the saved N64 state.
- RetroArch Settings does not appear while using standalone N64; renderer and N64-specific options live in the standalone overlay instead.
Saturn (optional standalone YabaSanshiro)
Section titled “Saturn (optional standalone YabaSanshiro)”Saturn games default to YabaSanshiro in RetroArch. For a directly launched
.ccd, .chd, .cue, .iso, or .mds game, you can instead choose
YabaSanshiro Standalone with Core from the game or system Options
menu. The standalone route performed better in device testing, but RetroArch
remains the safer default and is always used for .m3u playlists and .zip
files.
YabaSanshiro is developed by devMiyax.
Standalone runs its own session, so Leaf’s in-game menu, game switcher, and RetroArch save states do not apply:
- MENU opens YabaSanshiro’s own menu, where you can resume, manage native save states, change emulator settings, or exit.
- In-game saves are kept under
Saves/YabaSanshiro/; native.yssstates are kept underStates/YabaSanshiro/. They are not compatible with RetroArch save states or Leaf’s state browser. - HLE BIOS is used by default. For a real BIOS, use Saturn BIOS in the game or system Options menu. See BIOS and cores.
- The native Open/Close CD Tray picker only scans the current game’s folder
for sibling
.cue,.mdf,.ccd, and.chdfiles. It does not understand Leaf.m3uplaylists and does not list sibling.isoor.mdsfiles, so the list may be empty even when another disc is present. Use RetroArch for reliable multi-disc playlist switching.
Nintendo DS (standalone DraStic)
Section titled “Nintendo DS (standalone DraStic)”Nintendo DS games run in DraStic, a standalone emulator rather than RetroArch, so the in-game menu, save states, and switcher above don’t apply - DraStic has its own menu and its own controls.
Leaf ships two front ends for DraStic. The default one is described here; Fun DraStic is an alternate you can pick per game, and it’s covered further down.
DraStic itself is closed-source. The two-screen layouts, the transparent overlay, and the button shortcuts below all come from Steward Fu’s open-source SDL2 wrapper for DraStic, which Leaf forks and builds on - most of the heavy lifting here is his work. Because the DS has two screens and a touch screen, the wrapper maps everything onto the handheld using MENU as a modifier you hold together with another button.
These chords are fixed and belong to DraStic, not to Leaf. They are not the configurable hotkeys. MENU + L1 here quits DraStic regardless of what you have set your Leaf screenshot shortcut to.
Everyday controls
Section titled “Everyday controls”- MENU (tap and release) - open DraStic’s own menu: save/load states, options, and the screen-layout picker.
- MENU + Start - open the Steward Fu menu for the see-through second screen (its size, position, transparency, and border).
- MENU + A - flip between your two saved screen layouts. By default that’s the normal stacked view and a transparent second screen tucked into the corner.
- MENU + Left / Right - cycle through all of the screen layouts.
- L2 - switch the D-pad between controlling the game and controlling the DS touch pointer. In pointer mode the D-pad moves the stylus and A taps the screen; press L2 again to switch back.
- R2 - swap the two DS screens, so the other one becomes the main view. Handy with the transparent overlay, or for games that put the action on the bottom screen.
Save states, fast-forward, and quitting
Section titled “Save states, fast-forward, and quitting”- MENU + L2 - save state.
- MENU + R2 - load state.
- MENU + R1 - fast-forward (hold).
- MENU + L1 - quit back to the launcher.
- MENU + Select - also opens DraStic’s own menu.
Display tweaks
Section titled “Display tweaks”- MENU + B - toggle the picture between sharp pixels and smoothing.
- MENU + Y - cycle the menu background art (or, in pointer mode, the stylus cursor).
MENU + Up is intentionally inactive on the Pocket 1. On other devices it toggles DraStic’s microphone, but that feature relies on a recorded sample played back into the game rather than live mic input, and the Pocket 1’s 64-bit DraStic is a closed-source build the wrapper has to drive through fragile internal entry points. Triggering the microphone that way crashed the emulator, so the shortcut is switched off here until it can be wired up safely.
Inside DraStic’s own menu (and the Steward Fu menu), use the D-pad to move, Left / Right to change a value, A to confirm, and B to go back or close.
Fun DraStic, the alternate DS front end
Section titled “Fun DraStic, the alternate DS front end”Fun DraStic gives your DS games a redesigned menu, screen overlays, more screen layouts, and themes. Switch a game over to it with Core from that game’s Options menu, and switch back the same way. DraStic stays the default for everything you haven’t changed.
Fun DraStic runs the same closed-source DraStic emulator binary as the default front end. You are choosing its menus, layouts, and controls; there is no newer emulator core underneath.
Fun DraStic is by tenlevels, whose work is the menus, overlays, screen layouts, and presentation, in the same way the default DS front end is Steward Fu’s work. You can read Fun DraStic’s source and credits; the frontend uses the PolyForm Noncommercial 1.0.0 license.
A few things to know before you switch a game over:
- MENU opens Fun DraStic’s own menu, which is laid out differently from the default one. The MENU + button shortcuts above belong to the Steward Fu front end and don’t carry over.
- Your in-game saves come with you. Both front ends read and write the same DS save files, so a game you switch keeps its progress, and so does a game you switch back.
- Save states and settings do not. Each front end keeps its own, so a save state you made in one won’t appear in the other. Save in-game before you switch.
- Neither one needs a BIOS file of your own. See BIOS and cores for the included replacement BIOS and the correct locations for optional Nintendo files.
NEC PC-98 (Neko Project II kai)
Section titled “NEC PC-98 (Neko Project II kai)”PC-98 games run through the Neko Project II kai RetroArch core. Leaf enables the core’s Arrows joypad mode by default so games that ask you to press a key work from the handheld without a keyboard:
- D-pad - keyboard arrow keys.
- A / B - keyboard X / Z.
- X / Y - keyboard Space / Left Ctrl.
- L1 / R1 - keyboard Backspace / Right Shift.
- SELECT / START - keyboard Escape / Return. Press START at a typical “press any key” prompt.
For a mouse-driven game, open MENU → RetroArch Settings → Quick Menu → Core
Options and change Joypad D-pad to Mouse/Keyboard/Joypad Mapping to
Mouse. In that mode the D-pad moves the pointer, B left-clicks, and
A right-clicks. Switch it back to Arrows for keyboard-driven games.
For software that needs two floppy drives populated at startup, use a
PC-98 .cmd launch file.
Later disk changes can be made from RetroArch’s Disc Control menu.
Amiga (PUAE)
Section titled “Amiga (PUAE)”Amiga games run through PUAE 2021 in RetroArch by default. You can choose PUAE instead with Core in the game or system Options menu. Both come from the UAE and libretro teams. They keep separate save and state folders, so return to the same core to continue your progress. The default handheld controls are:
- D-pad - joystick; B / A - fire buttons 1 / 2.
- Left or right analog stick - mouse; L2 / R2 - left / right mouse button.
- X - Space.
- SELECT (short press) - toggle PUAE’s virtual keyboard. In the keyboard, use the D-pad to move, B to press a key, A for transparency, X for Space, and START for Return.
Some Amiga games expect a mouse instead of a joystick. Open the virtual keyboard and choose J/M, or change Quick Menu → Core Options → RetroPad Joystick/Mouse. Multi-disk games use MENU → RetroArch Settings → Quick Menu → Disc Control to eject, choose the next disk, and insert it.
PUAE 2021 saves normal game data under Saves/PUAE 2021/ and states under
States/PUAE 2021/. The alternate PUAE core uses Saves/PUAE/ and
States/PUAE/. CDTV/CD32 NVRAM, WHDLoad helper/save images, generated save disks,
and core configuration are durable user data and survive Leaf updates. Writes
made inside a ZIP are the exception: PUAE does not repack the temporary archive,
so follow the persistence advice in
Adding games.
Dreamcast, Atomiswave, and Naomi (standalone Flycast)
Section titled “Dreamcast, Atomiswave, and Naomi (standalone Flycast)”Dreamcast, Atomiswave, and Naomi games default to standalone Flycast rather
than the RetroArch Flycast core, because the standalone path performs noticeably
better on this hardware. Each system keeps its own ROM folder (Roms/DC/,
Roms/ATOMISWAVE/, or Roms/NAOMI/), while Naomi, Naomi GD-ROM, and Naomi 2 all
share Roms/NAOMI/. Switch emulator with Core from a game or system’s
Options menu; RetroArch Flycast remains the first compatibility fallback.
Like the other standalone emulators, it runs its own session, so the in-game menu, save states, and switcher above don’t apply:
- MENU - open Flycast’s own menu, rotated to match the screen. Save states, video and controller settings, and exiting all live there.
- SELECT - insert a coin in Atomiswave and Naomi games.
- A, B, L1, X, Y, R1 - arcade buttons 1 through 6 respectively. Metal Slug 6 uses L1 for grenades.
- L2 / R2 - Dreamcast left and right analog triggers. Crazy Taxi uses L2 for brake/reverse and R2 for acceleration.
- Dreamcast uses VGA output by default. Flycast automatically falls back to composite for games that do not support VGA.
- Your VMU memory-card data and Flycast settings survive Leaf updates. VMU data
and saves are kept under
Saves/Flycast/, and Flycast’s own save states underStates/Flycast/. Dreamcast, Atomiswave, and Naomi share these durable locations rather than creating separate emulator copies.
PSP (standalone PPSSPP)
Section titled “PSP (standalone PPSSPP)”PSP games run in PPSSPP, standalone rather than through RetroArch, because a dedicated build is much faster on this hardware. There are two versions to pick from with Core in a game or system’s Options menu:
- PPSSPP (Vulkan) - the default, and the faster of the two.
- PPSSPP (GLES) - a fallback for anything that misbehaves on Vulkan.
Both read the same Roms/PSP/ folder, and PSP needs no BIOS.
This is PPSSPP’s own session, so Leaf’s in-game menu, Leaf’s save states, and the game switcher don’t apply:
- MENU - open PPSSPP’s own pause menu. Save states, its graphics and control settings, and exiting the game all live in there.
- Volume keys work as usual.
Those menus follow Leaf’s language, so setting Leaf to 中文 puts PPSSPP in Simplified Chinese as well. See Language.
The analog stick uses the calibration from Joe’s Calibrage, so if the stick drifts or doesn’t reach full tilt in PSP games, calibrate it there rather than inside PPSSPP.
If your face buttons or stick were wrong
Section titled “If your face buttons or stick were wrong”Early Leaf releases shipped a default mapping with Square and Triangle swapped, and with analog Up mapped to a button instead of the stick. Both are fixed.
If you have been playing PSP games since before that fix, Leaf corrects the two mappings once, on the next PSP launch. It only touches them if they still hold those exact original values, so a mapping you set yourself is left alone. If you had already worked around the swap with your own remap, that remap survives and you may want to undo your workaround in PPSSPP’s control settings.